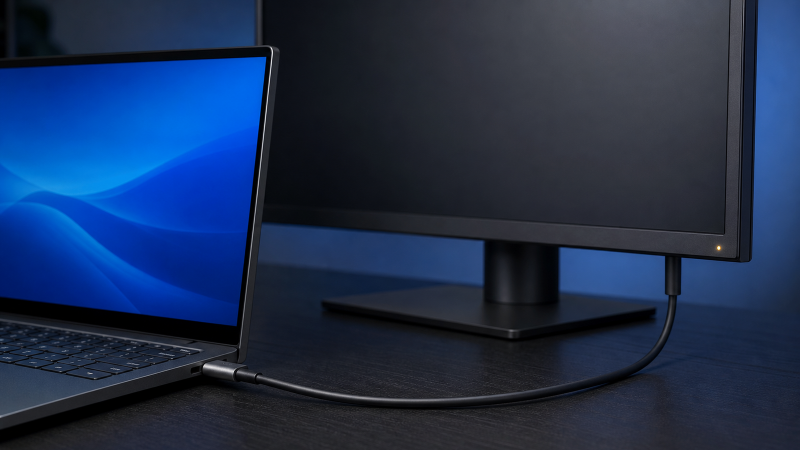
If your USB-C monitor is not working in Windows 11, start with the physical display path. Confirm that the exact USB-C port on the computer supports DisplayPort Alt Mode or a Thunderbolt display path. Power the monitor as its manual requires, select the documented input, and connect it directly with the monitor’s supplied cable or a known-good full-featured cable.
Do not use charging as proof of video. A laptop can receive power while the display path is absent, connected to the wrong input, or limited by the cable. Windows settings can detect and arrange a valid display connection, but they cannot add video capability to a port that does not have it.
The first safe isolation test is simple:
- Use the computer maker’s current specification to identify a video-capable USB-C or Thunderbolt port.
- Remove the dock, hub, extension, adapter, and monitor passthrough.
- Connect the monitor directly with its supplied cable or a known-good full-featured cable.
- Power the monitor and select the exact input named in its manual.
- Only then use Windows 11 Detect and projection settings.
Match the Symptom to the Next Test
Write down the symptom before changing anything. “Black screen” is too broad. The monitor’s own message, Windows behavior, charging state, and whether another port works all narrow the next step.
| What you see | What it establishes | Best next test |
|---|---|---|
Monitor says No signal |
The monitor has not accepted a usable signal on its selected input | Prove the exact host port carries video, then check the monitor’s documented input |
| Monitor is absent from Windows Display settings | Windows has not enumerated a usable display path | Build the direct known-good path first, then use Display > Multiple displays > Detect |
| Laptop charges but there is no picture | Power is present; video is still unproven | Verify the host port, cable video capability, and monitor input role separately |
| Picture appears at a lower resolution or refresh rate | The complete path exposed or negotiated a lower mode | Record the full path and test a conservative supported mode before replacing hardware |
| One USB-C port works and another does not | The two ports may have different features or routing | Read the exact computer port map and use the port documented for video |
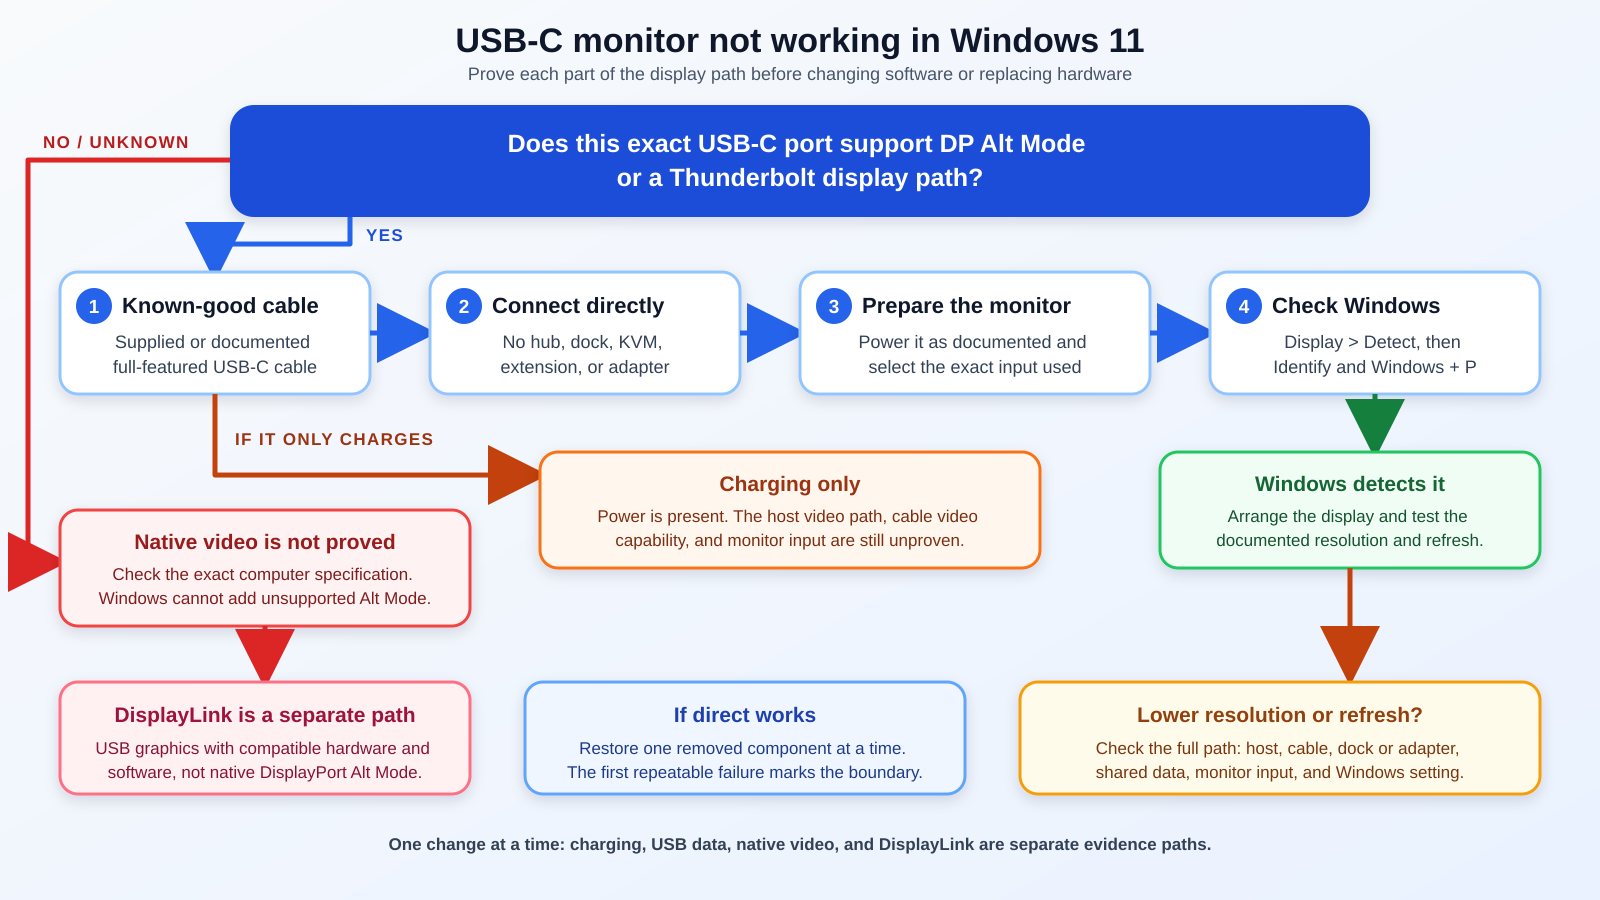
Order matters. Changing drivers with a charging-only cable installed produces noise. So does replacing a dock before testing directly. Make one controlled change, record it, and keep proved-good components fixed.
Check 1: Prove the Exact Computer Port Carries Video
Two USB-C ports on the same laptop can have different functions. One may support DisplayPort Alt Mode, Thunderbolt, USB4, charging, and USB data. Another may offer a smaller subset. The shape alone does not distinguish them.
Use the exact computer model, not merely its family. In the maker’s current specification, port diagram, or manual, match the physical port by side and position. Look for DisplayPort, DP Alt Mode, or explicit Thunderbolt display capability. A charging symbol alone is insufficient.
If the specification is unclear, the complete USB-C DisplayPort Alt Mode check owns the host-capability proof. Do that proof once, then return here with the exact known video-capable port.
Microsoft documents a Display connection might be limited warning when the PC, display, cable, port, or intermediate device lacks the needed display feature. Record it exactly. Treat it as mismatch evidence, not a failed-component diagnosis. No warning does not prove video support.
ASUS makes the endpoint requirement explicit for the portable monitor models covered by its current support article: plug-and-play video requires video support on the USB-C port of both the computer and the monitor. ASUS also says model specifications depend on the manual. That is a useful general troubleshooting discipline, but it is not permission to apply an ASUS menu or reset sequence to a different monitor.
If one laptop port works and another does not, keep the working cable and monitor fixed. Compare only the ports, then check the maker’s port map. A repeatable difference that matches the documentation is expected behavior, not a Windows setting that needs to be enabled.
Check 2: Test the Cable and Remove Everything in the Middle
A USB-C cable can deliver power without carrying the high-speed signals required for the intended display path. USB-IF states that USB Type-C is a connector and is not another name for USB4, USB 3.2, or USB Power Delivery. Its current guidance also notes that a USB 2.0 Type-C cable does not include the signal conductors used for high-speed operation or Alt Mode.
Start with the cable supplied with the monitor when the exact manual assigns it to the video connection. Otherwise, use a known-good full-featured cable documented for the video mode shared by the computer and monitor. “It charges my laptop” is not a qualifying cable test.
Connect the cable directly from the proven computer port to the monitor’s documented upstream video input. Remove:
- USB-C docks and hubs
- KVM switches
- extension cables
- USB-C couplers
- adapters
- monitor passthrough from another display
- unrelated devices that share the same dock
Microsoft recommends a direct connection while diagnosing USB-C display limitations. Direct success does not prove that every dock is defective. It only shows that the simpler path works. Reintroduce one removed component at a time to find the first point where the display disappears.
If the direct path still fails, swap only the cable. Keep the computer, physical port, monitor, power arrangement, and selected input unchanged. If the picture returns with the known-good cable and disappears again with the original cable, the cable is the isolated changed component in that setup. Use the documented USB-C cable guide when you need a replacement with explicit video support instead of guessing from connector shape or wattage.
Inspect the connectors for debris or damage without inserting metal tools. Make sure each plug is fully seated and that the cable is not being pulled sideways by the monitor stand. If a connector, port, or cable is hot, deformed, loose, or visibly damaged, disconnect power and stop using it.
Check 3: Power the Monitor and Select Its Documented Input
The monitor must be powered according to its exact manual. Some portable displays need separate power under certain conditions even when video arrives over USB-C. A desktop docking monitor may have several USB-C-shaped ports with different upstream, downstream, charging, data, and video roles.
Use the model’s current port diagram. Do not choose a connector merely because the plug fits. Then use the monitor’s documented input or source control to select the port you connected. There is no safe universal button order because monitor menus and port roles differ.
Two current model pages show why exact roles matter:
- ViewSonic documents the VP2776T-4K’s Thunderbolt 4 upstream path as carrying video, data, audio, and power to a connected laptop. Its specification also lists a separate USB-C upstream connection, multiple other inputs, and an
Input Selectcontrol. - Dell documents the U2725QE’s Thunderbolt 4 upstream port with DisplayPort video and Power Delivery. Dell separately lists a USB-C KVM upstream port and USB-C downstream ports.
Those examples do not define every ViewSonic or Dell monitor. They show that several identical-looking connectors on one display can serve different jobs. Follow the exact model page or manual.
If the monitor says No signal, confirm that the message belongs to the input you connected. If it cycles through inputs automatically, select the intended input manually using the exact manual. Do not perform an undocumented factory reset or hold-button sequence. A reset can erase useful configuration without proving the cable or host path.
Check 4: Use Windows 11 Detect, Identify, and Projection Modes
Once the direct hardware path is valid, use Microsoft’s documented Windows 11 controls.
Open Settings > System > Display. If the monitor is connected but missing, expand Multiple displays and choose Detect. Detect asks Windows to look again for a display on a working path. It does not turn a data-only USB-C port into a video output.
If the display appears, choose Identify. Windows puts a number on each detected screen so you can match the Settings layout to the physical monitors. Drag the display rectangles to match their actual positions, then apply the layout.
Press Windows key + P and select the intended mode:
- PC screen only uses the computer display only.
- Duplicate shows the same desktop on both screens.
- Extend creates one desktop across the displays.
- Second screen only uses the external screen only.
PC screen only can make a valid external display look disabled. Switch to Extend or Duplicate for the first test. If the external monitor is your only visible screen, avoid choosing a mode that leaves you without a usable display until you know how the system behaves.
When Windows sees the monitor but the mode is wrong, select that display in Settings before changing resolution, scale, orientation, or refresh rate. Change one setting at a time. Use a conservative resolution and refresh rate documented by the monitor while you isolate the path.
Check 5: Update Windows, Then Stay Inside Exact Maker Support
Microsoft includes Settings > Windows Update > Check for updates in its current multi-monitor setup guidance. Install normal Windows updates, restart if Windows requests it, and retest the same direct path.
After that, use the current official support or download page for the exact laptop and exact monitor. Check whether the maker lists a display driver, graphics driver, USB controller package, dock package, monitor information file, or firmware that applies to your exact model and Windows version.
Do not substitute a search-result driver site. Do not flash a BIOS, dock, cable, or monitor with a package for a similar model. Do not disable Windows security or edit the registry to force detection. If the maker supplies an update procedure, follow that exact procedure and its power requirements. If it does not, do not invent one.
Device Manager can be useful when Windows reports a device error: Microsoft tells readers to open the device properties and record the error code. That code is evidence for the exact support path. A generic controller name does not prove which USB-C features the physical port implements.
If the direct connection works before a dock is restored but fails afterward, use the dock maker’s exact model page and supplied cable. When replacement is justified, the USB-C docking station guide keeps host, upstream cable, display output, and Power Delivery claims attached to exact models.
Why Charging Can Work With No Display
Power and video are separate functions that can share a USB-C connector. A monitor may send power to the laptop while the computer port lacks video, the cable lacks the required conductors, the wrong monitor port is used, or the wrong input is selected.
That means these statements are not equivalent:
The laptop is charging.The cable supports the intended video path.The computer port outputs display video.The monitor input accepts that video.Windows has detected a display.
Only the first statement is proved by a charging icon. Even charging wattage has its own source, sink, cable, and negotiated limits. If the buying question is specifically about a monitor that combines video with laptop charging, use the USB-C monitor with Power Delivery guide and verify the exact input and power direction.
The reverse is possible too. A monitor can display video while charging the laptop slowly or not at all if the monitor does not source the required power, the cable’s power class is lower, or the computer uses another charging input. Keep power diagnosis separate from the no-picture path.
Why the Resolution or Refresh Rate Is Lower Than Expected
A picture at a lower mode is different from no picture. It proves that some display path works, then asks whether the complete chain supports the intended timing.
Record:
- exact laptop and physical output port
- exact cable and length
- every adapter, dock, KVM, or passthrough device
- exact monitor input
- number of connected displays
- current resolution, refresh rate, color format, and bit depth when exposed
- whether USB data is sharing the same USB-C connection
DisplayPort over USB-C can carry video, USB data, and power through one connector. The implemented lane allocation and every component in the route affect the modes the full path can expose. Do not infer a cause from a raw link-rate label or from an HDMI timing table for a different monitor input.
First test a conservative mode documented by the monitor. Then remove intermediate devices and retest directly. If the desired refresh rate is the remaining issue, the high-refresh monitor cable guide owns that cable and timing question.
When Windows offers the desired mode only on the direct path, reintroduce the dock, adapter, KVM, and other display one at a time. When the direct path never offers it, compare the exact host output, cable, and monitor input specifications before buying anything.
Native Alt Mode, Thunderbolt, and DisplayLink Are Different Paths
Native DisplayPort Alt Mode carries a DisplayPort signal through USB-C. A Thunderbolt display path can transport display data through a Thunderbolt connection. Both require explicit capability throughout the relevant path.
DisplayLink is different. Synaptics describes DisplayLink as USB graphics implemented through its chips and software in docks, adapters, and monitors. A DisplayLink dock may add displays through ordinary USB data even when a host does not provide native DP Alt Mode on that connection.
Therefore:
- A working DisplayLink screen does not prove the host port supports native DP Alt Mode.
- A failed native Alt Mode connection does not prove a compatible DisplayLink product would fail.
- DisplayLink hardware requires the exact supported software and operating-system path.
If you deliberately need USB graphics, use the DisplayLink docking station guide and verify the exact product and current official software support. Do not install DisplayLink software to repair a native Alt Mode monitor unless the exact hardware actually uses DisplayLink.
When the Evidence Points to Different Hardware
Replace a component only after it is the isolated change.
Cable: Replace it when the direct path repeatedly works with a known-good full-featured cable and fails with the original cable, with everything else fixed.
Adapter or dock: Replace it when the direct computer-to-monitor path works, but the display fails as soon as that exact intermediate device and its correct upstream cable are restored. A monitor with an integrated dock is still a multi-function path; the monitor docking-station guide can help you compare documented topologies.
DisplayLink path: Consider it as a deliberate USB-graphics solution when native Alt Mode is unavailable or does not fit the required display count. Do not treat it as proof or repair of native video.
Monitor: Suspect the monitor or its input when the proven host port and known-good cable work with another compatible display, while the original monitor also fails from another known-good compatible source. If replacement is justified, the USB-C monitor guide keeps video-input and Power Delivery claims model-specific.
Thunderbolt monitor: Choose this path only when the host explicitly supports the required Thunderbolt display connection. The Thunderbolt monitor guide is the appropriate handoff for exact-model Thunderbolt inputs and docking features.
Computer port: Suspect the port when the same monitor and cable work from another known-good compatible source, the exact original port is documented for video, and it continues to fail after supported updates. Physical looseness, intermittent contact, visible damage, or heat should go to the computer maker or a qualified repair service.
Final USB-C Monitor Isolation Checklist
Follow this order and stop when the first failed requirement is found:
- Record the exact computer, monitor, cable, physical USB-C ports, selected input, and every intermediate device.
- Verify that the exact computer port explicitly supports DP Alt Mode or a Thunderbolt display path.
- Verify that the exact monitor port is a video input, not a data, charging, or downstream-only port.
- Power the monitor as its exact manual requires.
- Select the monitor’s documented input for that port.
- Use the supplied or a known-good full-featured cable documented for the shared video path.
- Connect computer to monitor directly, with no dock, hub, KVM, extension, or adapter.
- Record any Windows connection warning without treating it as a component verdict.
- Open Settings > System > Display > Multiple displays > Detect.
- Use Identify if Windows finds the display.
- Press Windows key + P and choose Extend or Duplicate for the initial test.
- If a picture appears at a lower mode, select a conservative supported setting and audit the full path.
- Check Windows Update, then use only the exact models’ current official support pages.
- Substitute one component at a time, keeping the rest fixed.
- After direct success, restore intermediate devices one at a time.
- Replace or repair only the component that repeatedly follows the failure.
Frequently Asked Questions
Why is my USB-C monitor not detected in Windows 11?
Windows will not detect a monitor through USB-C unless the hardware path carries compatible video. First verify the exact computer port, cable, monitor video input, power, and selected source. Connect directly. Then use Settings > System > Display > Multiple displays > Detect.
Why does my USB-C monitor say no signal?
No signal means the monitor has not accepted a usable signal on the selected input. It does not identify the cause. Check the proven video-capable host port, full-featured cable, direct connection, monitor power, and exact documented input before changing Windows drivers.
Why does USB-C charge my laptop but show no picture?
Charging proves that power is present. It does not prove that the port outputs video, the cable carries the intended display signals, or the monitor port is a video input. Verify those three capabilities separately.
Can a USB-C cable charge but not support a monitor?
Yes. USB Type-C cables do not all contain the same signal conductors or support the same features. A cable can carry USB 2.0 data and power without supporting the high-speed or Alt Mode path expected for native display video.
Why does one USB-C port work with my monitor while another does not?
Ports on the same computer can implement different features. Keep the working cable and monitor fixed, compare the physical ports, and read the exact model’s port map. Use the port explicitly documented for DisplayPort or Thunderbolt display output.
Will the Windows Detect button fix an unsupported USB-C port?
No. Detect asks Windows to look again for a display on an existing hardware path. It cannot add DP Alt Mode or Thunderbolt video to a data-only or charging-only port.
Does a working USB device prove the monitor video path is good?
No. USB data, power, and native display video are separate capabilities. A mouse, storage device, Ethernet adapter, or USB hub can work while the native video path is absent or limited.
Should I update the graphics driver first?
Start with the physical path because it is faster and safer to prove. After the direct known-good path is assembled, check Windows Update and the current official support pages for the exact computer and monitor. Avoid random driver sites and packages for similar models.
Is DisplayLink the same as USB-C DisplayPort Alt Mode?
No. DisplayLink is a USB-graphics system using compatible hardware and software. Native DisplayPort Alt Mode carries a DisplayPort signal through USB-C. A result from one path does not prove the other.
Why is my USB-C monitor limited to a lower resolution or refresh rate?
The mode belongs to the complete path: host output, cable, dock or adapter, shared USB data, monitor input, and Windows configuration. Test directly at a conservative supported mode, then add intermediate devices back one at a time.
Should I reset the monitor or change the BIOS?
Not as a generic first step. Use only the exact monitor and computer makers’ current instructions for your models. An undocumented reset or firmware change can erase evidence or create a new problem without proving the display path.
How We Research
This guide uses a July 23, 2026 evidence cutoff. We read Microsoft’s current USB-C troubleshooting and multiple-monitor guidance, USB-IF’s Type-C language guidelines, VESA’s DisplayPort over USB-C explanation, Synaptics’ DisplayLink overview, and current exact-model pages from ASUS, ViewSonic, and Dell.
We separate universal interface boundaries from model-specific examples. Microsoft controls the Windows menu paths and limitation-warning scope. USB-IF controls the distinction between the connector, data protocols, and power. VESA controls the DP Alt Mode description. ASUS, ViewSonic, and Dell statements apply only to the models and port roles their pages identify. Synaptics controls the DisplayLink USB-graphics distinction.
We do not claim personal testing, a repair success rate, or an assured outcome. The troubleshooting method relies on direct connection and one-variable substitution: prove the host port, cable, and monitor input, then reintroduce removed components one at a time. That produces a reproducible component boundary without pretending that Windows can read capabilities the hardware does not expose.