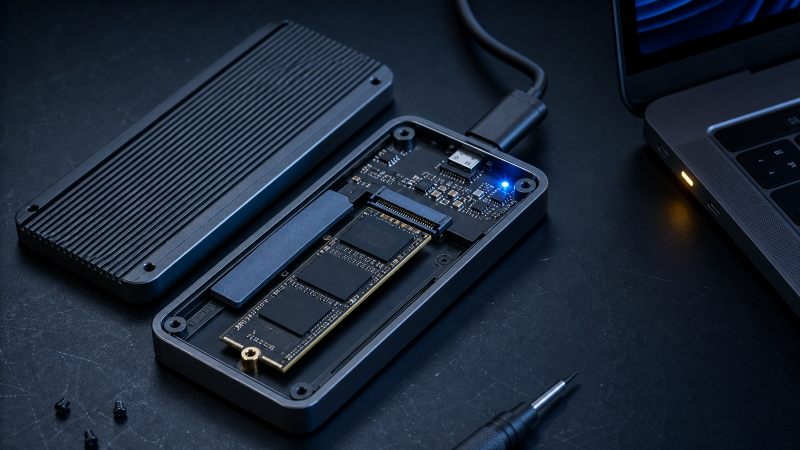
If Windows detects your USB4 enclosure but the SSD is missing, do not initialize or format anything yet. First find the last layer that Windows can see. Check the enclosure bridge in Device Manager, the disk object in PowerShell or Disk Management, and the volume and drive letter separately. A bridge can appear even when it has not detected the installed SSD.
Start with the exact enclosure and SSD model numbers. Confirm that the enclosure supports the SSD’s protocol, key, and length. Then reseat or substitute one part at a time only if the maker permits it and the data value is known.
A visible bridge does not prove the bridge found the SSD inside it.
The procedure starts after the enclosure or bridge appears in Windows. If the whole USB4 device is absent, use the Windows Thunderbolt and USB4 detection guide. If the volume mounts but performs poorly, the problem belongs to a speed diagnosis, not the missing-SSD state.
Start here: match the observed state
| What Windows shows | What it proves | What to do next |
|---|---|---|
| No enclosure, bridge, or USB4 device | Windows has not reached the enclosure | Troubleshoot the host port, cable, authorization, and whole device |
| Enclosure or bridge appears, but no disk appears | Windows sees the parent device but not a usable SSD object | Check SSD support, seating, the enclosure, and the SSD |
| A disk appears as Offline | Windows sees the SSD as a disk | Identify it by model, serial, and size before considering Online |
| A disk appears as Unknown or Not Initialized | Windows sees the disk, but it lacks a Windows-ready partition state | Initialize only if it is a known new or disposable SSD |
| A disk is Unallocated | The disk exists but has no usable volume in that space | Create a volume only when erasing or setting up that disk is intended |
| A healthy volume has no drive letter | The SSD and volume exist | Add a letter only after confirming the correct volume |
| A volume appears as RAW or unreadable | Windows sees media but not a usable file system | Stop before formatting and move to data-aware help |
The state table prevents a common error. “Not in File Explorer” does not always mean “SSD not detected.” File Explorer is the last checkpoint, after the bridge, disk, partition, file system, and drive letter.
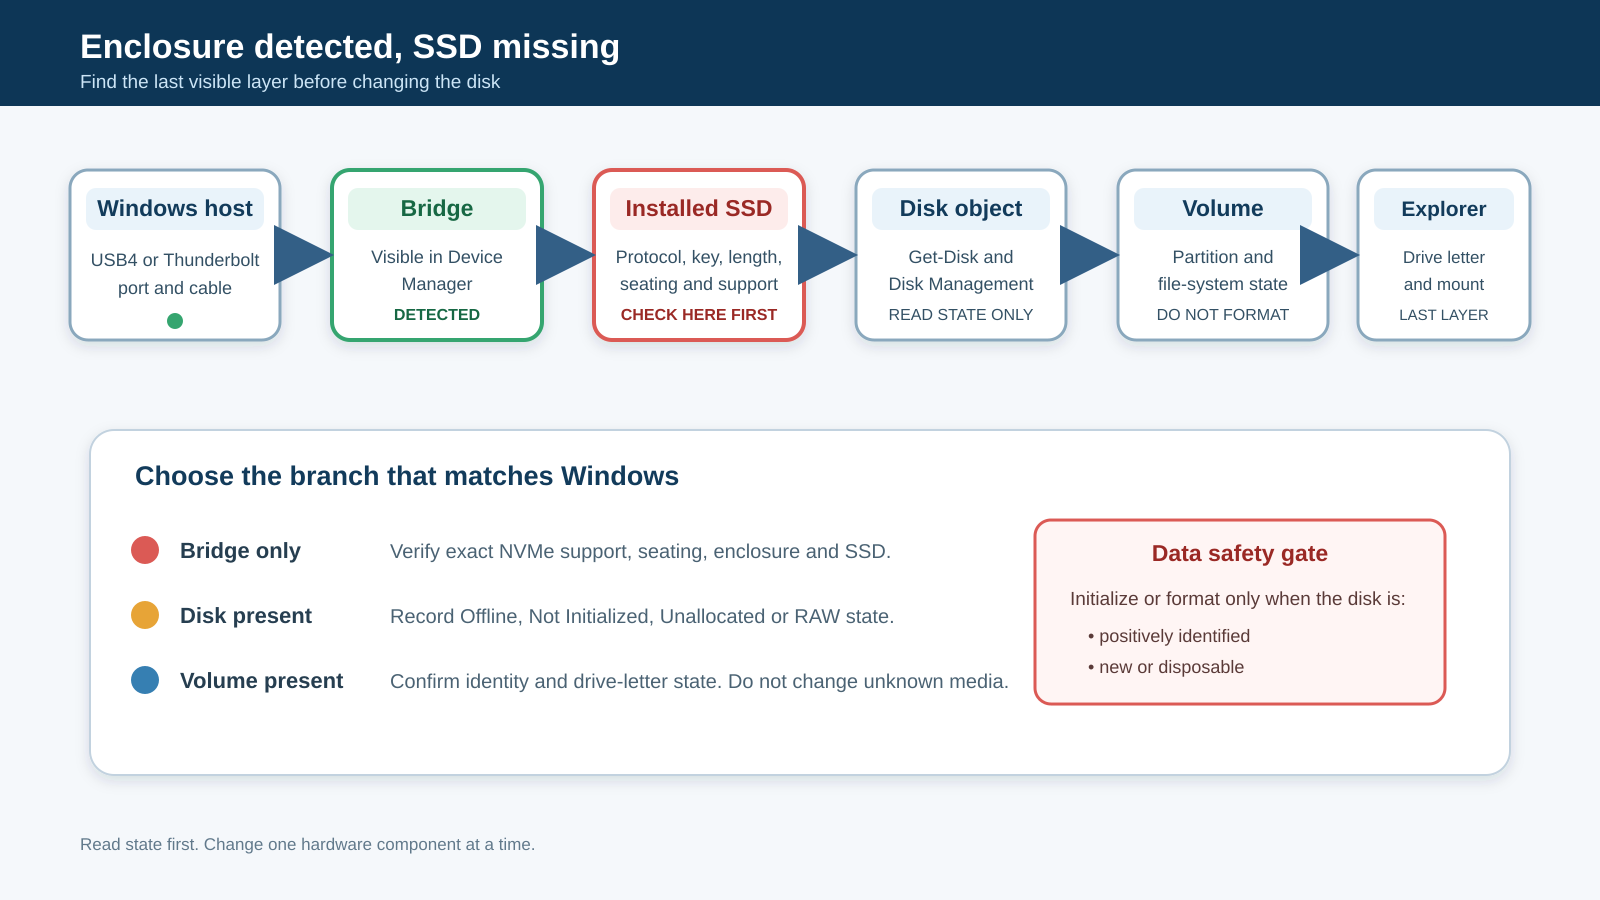
The safe order for a missing SSD
Each step reads a state. None of them writes to the disk.
- Record the exact enclosure, SSD, host, port, and cable.
- Prove that Windows sees the enclosure bridge.
- Ask Windows whether a disk object exists.
- Read Disk Management and record the disk state without acting on it.
- Prove the SSD’s protocol, key, length, and seating against the exact manual.
- Isolate host port, cable, enclosure, and SSD one variable at a time.
- Choose an action only after the observed state names the failed layer.
Beyond the data-safety gate above, do not reach for a generic driver utility, a registry edit, a blanket BIOS update, bridge firmware taken from a similar model, or diskpart clean. None of them identifies a layer, and several destroy the evidence or the contents of the disk you are trying to read.
Record the exact hardware before opening anything
Write down the enclosure model, SSD model, M.2 length, and any label that states NVMe, PCIe, SATA, M-key, or B+M-key. Also record the host computer, port used, and cable model when it is identifiable.
M.2 describes a physical form factor. It does not make every M.2 drive compatible with every enclosure. For example, StarTech’s current 1USB4-NVME-ENCLOSURE datasheet supports named M.2 NVMe lengths and explicitly excludes M.2 SATA. The exclusion applies only to the StarTech model. Your enclosure may have a different controller and support list.
A USB-C connector does not prove the required storage mode. USB-IF treats USB Type-C as connector terminology and requires supported functions to be stated separately. Read the host, cable, and enclosure specifications instead of relying on the plug shape. The USB4 explainer and USB4 versus Thunderbolt 4 guide explain the protocol boundary, but the exact product manuals still control.
Before opening the enclosure:
- Shut down any application that may be using external storage.
- Eject the enclosure if Windows offers a safe-eject action.
- Disconnect the enclosure from the host and external power.
- Read the exact installation guide.
- Continue only if the enclosure is designed for user installation.
Do not open a sealed complete external SSD. Do not copy the disassembly steps from a similar-looking model.
Step 1: prove that Windows sees the enclosure bridge
Open Device Manager. Look under Disk drives, Storage controllers, Universal Serial Bus controllers, and Universal Serial Bus devices. The exact category varies with the bridge and host path.
Record the displayed device name and any status code. Microsoft’s Device Manager error-code guide treats each code separately. Do not turn an unknown device or one warning symbol into permission to install a generic driver utility.
Compare two states:
- The enclosure entry disappears when you unplug the enclosure and returns when you reconnect it.
- A disk-drive entry also disappears and returns.
If only the enclosure or bridge entry changes, Windows is reaching the parent device without exposing a disk. If a disk-drive entry changes too, continue to the disk and volume checks.
Some USB4 systems expose a USB4 page in Windows Settings. Microsoft says that page depends on USB4 host-router enumeration and the computer maker’s implementation. Its absence does not prove the enclosure or SSD is faulty. Use the Windows USB version guide as supporting context, not as the SSD detection test.
Step 2: ask Windows whether a disk object exists
Right-click Start and open Terminal or PowerShell. Run:
Get-Disk | Format-Table Number,FriendlyName,SerialNumber,OperationalStatus,PartitionStyle,SizeMicrosoft documents Get-Disk as a command that gets disks visible to the operating system. The command above only reads and displays state. It does not initialize, format, clean, or change a disk.
Compare the list with the enclosure disconnected and connected. Use model, serial number, and capacity together when possible. Do not identify a disk by number alone because disk numbers can change.
There are three useful outcomes:
- No new disk appears. The problem remains between the bridge and SSD.
- A new disk appears with an unusual operational or partition state. Continue to Disk Management.
- A known disk and partition appear. The missing layer may be the volume, file system, or drive letter.
If the disk appears here, the SSD is not missing from Windows at the hardware level. The later state still needs care, but buying another enclosure is premature.
Step 3: read Disk Management without changing the disk
Open Disk Management by right-clicking Start and selecting Disk Management. Microsoft’s Disk Management guide documents the states and actions you will see.
Do not click through a prompt automatically. Record:
- disk number;
- displayed model or name, if shown;
- total size;
- Online or Offline state;
- partition style;
- allocated or unallocated space;
- file-system label;
- volume health;
- drive letter.
Take a screenshot for your own reference if several disks have similar capacities. Disconnect other removable drives when doing so is safe. Fewer attached disks reduce the chance of acting on the wrong one.
If the disk is Offline
Offline means Windows exposes a disk object. It does not mean the SSD is absent.
Confirm the model, serial, and capacity first. If the disk belongs to another system, a storage pool, or an organization, stop and ask the owner or administrator before changing the state. If it is your known ordinary external disk, follow Microsoft’s exact Disk Management procedure rather than a third-party repair script.
If the disk is Not Initialized
Not Initialized also means Windows sees the disk. Initializing prepares a new disk for partitioning. It is not a detection fix.
Proceed only when all three statements are true:
- the disk is positively identified;
- it is new or its contents are disposable;
- you intend to create a new volume.
If the SSD was previously used or may contain needed data, cancel the prompt. Do not choose a partition style to see whether the files come back.
If the space is Unallocated
Unallocated space has no usable volume. Creating and formatting a new volume is appropriate for a known new SSD that you intend to erase and set up. It is inappropriate for an SSD that should already contain files.
Microsoft warns that formatting destroys data. If the previous contents have value, stop. Partition reconstruction and data recovery are outside the article’s scope.
If a healthy volume has no drive letter
A healthy recognized volume without a drive letter can be absent from File Explorer even though Windows sees the SSD and file system. Confirm the volume by label, size, and disk position. Then use the supported Disk Management drive-letter action if the letter is the only missing layer.
Do not assign a letter to an unfamiliar recovery, system, or reserved partition. Do not assume that every partition should appear in File Explorer.
If the volume is RAW
RAW is not an invitation to format. It means Windows is not presenting a normal supported file system for that volume. The reason can involve file-system damage, unsupported formatting, encryption, or other states outside this guide.
If the data has value, disconnect the SSD safely and move to qualified recovery help. Do not run repair commands from a generic checklist.
Step 4: prove the SSD matches the enclosure
If the bridge appears but Windows never exposes a disk, compare the SSD label and enclosure manual line by line.
Check:
- NVMe PCIe or SATA protocol;
- M-key, B-key, or B+M-key support;
- supported lengths such as 2230, 2242, 2260, or 2280;
- single-sided or double-sided clearance when the maker specifies it;
- any capacity or generation restriction stated by the maker;
- the required retention screw, latch, spacer, or standoff;
- thermal-pad placement that might prevent full insertion if installed incorrectly.
Do not infer protocol from the notch alone. Use the full SSD model number and its maker’s specification.
If you discover a SATA M.2 SSD in an NVMe-only enclosure, the pairing is unsupported even if the module fits. A USB-C SATA enclosure belongs to a different storage path. Choose hardware only after confirming the drive type.
Step 5: reseat the SSD only under the exact procedure
Reseating can correct an incomplete insertion, but it also creates physical and data risk. Follow only the enclosure maker’s guide.
The safe pattern is:
- Disconnect the enclosure and external power.
- Use static-safe handling.
- Remove the SSD only by the documented mechanism.
- Inspect the connector and module for visible damage or debris without scraping contacts.
- Insert the SSD at the documented angle and depth.
- Secure the correct standoff or latch without bending the module.
- Place thermal material exactly as the maker shows.
- Close the enclosure before reconnecting it.
Do not keep reconnecting an SSD that smells burnt, becomes unusually hot immediately, has liquid damage, or shows a damaged connector. Stop and use qualified hardware support.
Step 6: isolate one component at a time
Use controlled substitution only after recording the original state.
Change the host connection
Keep the enclosure, SSD, and cable fixed. Try another port that the computer maker documents for the required USB4 or Thunderbolt path. A changed result points to the original port, host mode, or connection route.
If you need to verify the data cable rather than guess from charging behavior, use the USB-C cable testing guide. If the cable is physically damaged or not documented for the connection, the current USB-C cable guide is a later shopping route.
Change the enclosure
Use another enclosure only when its official support list matches the exact SSD. Keep the host, port, and cable known. If the SSD appears in the second enclosure, the original enclosure or its SSD pairing becomes the leading issue.
Change the SSD
Use a known-compatible spare SSD only when it contains no needed data and the enclosure maker allows installation. If the spare appears, the original SSD or its compatibility is isolated. If neither appears, the enclosure or connection remains suspect.
Change the computer
Use a second supported computer with the same enclosure, SSD, and cable. A changed result separates the original host path from the storage assembly. It does not prove which host setting or component is responsible.
Make one change per test. Changing the port, cable, enclosure, and SSD together gives you a result with no clear cause.
Escalation matrix
| Evidence after isolation | Best owner or support path | What to provide |
|---|---|---|
| Whole enclosure never appears | Computer or enclosure maker, or the whole-device guide | Host model, port, cable, enclosure model, Device Manager state |
| Bridge appears but two known-compatible SSDs do not | Enclosure maker | Enclosure model, bridge name, SSD support evidence, seating steps |
| Original SSD fails in two compatible enclosures | SSD maker or data specialist | SSD model, prior use, physical condition, data value |
| Disk appears but is RAW or unexpectedly unallocated | Data-aware storage support | Disk identity, prior file system, screenshots, no formatting performed |
| Known new SSD appears as uninitialized | Microsoft Disk Management procedure | Confirmed model, serial, size, intended new setup |
| Healthy volume lacks only a letter | Windows volume support | Confirmed disk and volume identity |
Report failed comparisons as well as successful ones. Support needs the exact state before and after each test.
When replacement is justified
Replacement is reasonable after evidence identifies an unsupported or failed layer.
Use the USB4 NVMe enclosure guide when the existing enclosure does not support the SSD’s protocol or when controlled tests isolate the enclosure. Use the portable SSD guide if you want a complete drive instead of managing a bridge and bare SSD. The Thunderbolt 5 external SSD guide is relevant only when the host and workload justify that different product class.
Do not replace hardware because File Explorer lacks a drive letter. Do not buy a new SSD while Disk Management already shows the correct disk and the actual issue is a volume state.
Frequently asked questions
Why does Device Manager show the enclosure but not the SSD?
The host can enumerate the enclosure’s USB bridge even when the bridge does not detect a usable installed SSD. Check whether Get-Disk or Disk Management gains a disk when you connect the enclosure. If it does not, verify exact SSD protocol, key, length, seating, and enclosure support.
Should I initialize the SSD when Windows asks?
Only initialize a positively identified new or disposable SSD that you intend to set up. Cancel if the SSD was previously used or may contain needed data. Initialization and later volume creation are setup actions, not harmless detection tests.
Can an NVMe SSD fit but still be incompatible?
Yes. An M.2 module can fit physically while using a protocol the enclosure does not support. Read both model specifications. The named StarTech USB4 enclosure, for example, supports listed NVMe modules and excludes M.2 SATA, but other enclosures have their own rules.
Why is the SSD absent from File Explorer but visible in Disk Management?
File Explorer needs a usable mounted volume and normally a drive letter. Disk Management can show earlier states such as Offline, Unallocated, RAW, or a healthy volume without a letter. Identify the exact state before choosing an action.
Will a different USB-C cable make the SSD appear?
A suitable cable can matter when the current connection is unsupported or damaged, but bridge visibility already proves that some communication exists. Keep the enclosure and SSD fixed and change only the cable. Use the exact host and enclosure cable requirements rather than choosing by connector shape.
Sources and methodology
The guide maps Windows states to the layer they prove. Microsoft controls Device Manager, Get-Disk, USB4 Settings, and Disk Management procedures. NVM Express establishes NVMe provenance. USB-IF controls connector terminology. StarTech’s current datasheet supplies one exact compatibility example, and Western Digital supports the data-loss warning.
The complete claim map and retrieval limits are in the accompanying source ledger. No hardware was tested, no universal repair outcome is claimed, and search results or forums were not used as factual authority.