In this article, we’ll try to go into detail and give you a solid foundation for understanding computer monitors so you’re better equipped with the information needed to choose the best monitor suited to your needs.
To start, a few words on this guide’s structure, since it’s quite lengthy, you can hopefully make the most out of it while spending the least time.
Table of Contents
2025 Update (What’s changed since we published this guide)
Monitors moved fast in 2024–2025. Decide early whether you want OLED for perfect blacks and instant response, or Mini-LED/IPS for crisp text and bright SDR/HDR.
Panel tech. OLED is now firmly mainstream in 27–34″ (both WOLED and QD-OLED), with better text rendering, higher ABL limits, and stronger burn-in mitigations. Mini-LED LCDs added far more local-dimming zones (often 1K–5K), pushing real HDR while keeping LCD sharpness.
Speed. At the high end, 4K at 240 Hz arrived, while esports panels jumped to 360–480 Hz at 1080p/1440p. DSC is now ubiquitous, so high-res/high-Hz over a single cable is common.
Connectivity. More models include USB-C with 90–140 W power delivery, built-in KVM switches, and console-friendly HDMI 2.1 features (VRR/ALLM) alongside DisplayPort 2.x—but verify the actual UHBR bandwidth on the spec sheet.
Labels that matter. Look for VESA ClearMR (a clearer blur metric than “1 ms GtG”) and updated DisplayHDR / True Black tiers to set realistic HDR expectations. OS-level HDR calibration on Windows/macOS is also much improved.
Bottom line. Pick the panel type first (OLED vs Mini-LED/IPS), then match resolution/refresh to your GPU and workflow. Double-check ports, USB-C PD, and KVM if you dock a laptop. 3:2 and ultrawide options remain excellent for productivity.
Our approach for this guide is to explain in detail monitor specs that we considered significant factors for typical consumers and, to a lesser extent, features that we deemed minor to the ordinary consumer.
You’ll also notice we have included some videos from external sources in some sections. This is because we’d like this guide to give you a solid overview of computer monitors without it being too tedious, and videos from authorities in the computer hardware space, curated in a helpful way, seemed like the way to go. We have also left a few notes on each video to help you decide if you think you need to watch it or not to save you time.
We hope this guide helps you choose the best monitor to suit your needs.
If you think that we’ve missed anything (or have done a feature an injustice by calling it “lesser”), then feel free to leave a comment or contact us, and we’ll get back to you as soon as we can.
So… Monitors.
The very screen of a PC may simply seem like any typical output peripheral.
After all, they fundamentally work as a medium for the main unit to put out what it visually does, at least in principle. The performance factor still largely resides in your computer.
But, as you may have quickly realized today, monitors come in an almost infinite multitude of different size tiers, configurations, specifications, and advanced features. You then are faced with the 100% very likely possibility any of these would have a significant impact on how your display hardware would truly perform.
Spoiler alert, most of these things do. In fact, at this point, you’d really want to prioritize your monitor in the same way as you prioritize your primary computer.
Part 1 – Assemblage of Colored Dots: How Monitors Actually Work
Imagine an entire grid of very tiny, almost microscopic squares (quadrilaterals) that can change into either blue, red, or green. That is exactly the basic framework for all commercial display technologies today.
Therefore, an image on a screen is simply a specific configuration of each colored square of that grid which, when summed up together, forms the multimedia you see on it.
Pixels of the Most Common Variety
In our modern times, those squares fit snugly into what are called pixels, the smallest addressable (color-shifting) bit on digital, fixed-count displays.
You might have already seen an individual pixel, either by using a magnifying tool or simply looking hard at relatively bigger screens with fewer total pixels in them.
Either way, these pixels pretty much dictate many of the capabilities and specifications of your monitor. They also serve as the biggest indicator of cost along with the monitor’s physical size, apart from other things such as refresh rates.
In terms of the type of technology that enables pixels to shift into the colors that produce images, the Liquid Crystal Display, or LCD, still stands economically above the rest.
There is specific chemical and electric stuff at work when LCD screens show combinations of greens, blues, or reds via pixels. But in general, LCDs modify the light that passes through it by adjusting the light-absorbing properties, or emitted wavelengths, of liquid crystals, which are then manipulated in the first place using electricity.
To primary configurations that make this happen are:
- Active Matrix – the default configuration for most LCD monitors today. The entire screen is covered in a matrix of tiny transistors and capacitors. When a charge signal is sent, only those points directly corresponding to the modified pixel receive the charge, which is kept until the screen refreshes to the next image cycle.
- Passive Matrix – this one is the technically obsolete version. Instead of an array of tiny individual components, this one only opts for a special conductive metal grid to deliver the charge. Cheaper to produce, but suffers a lot nowadays due to relatively slower response times and imprecise voltage control.
More than One Kind of Colored Dot
It is important to note that while LCD can shift colors and change shades of opacity, it cannot produce its own light like plasma or CRT. It requires a backlight, in order to send the completed image directly to the viewer.
Apart from the liquid crystal layer itself, this backlight also forms the backbone of different alternative technologies available to LCD screens today. More traditional LCDs would usually use fluorescent lighting a few decades back. But today, almost all major LCD hardware models use light-emitting diodes, or LEDs.
So the term “LED screen” is actually a shortened form of “LED-backlit LCD screen”, directly explaining why such screens don’t actually use LEDs to create the pixel color combinations.
In fact, other major pixel display technologies also play on the concept of backlighting and wavelength modulations, to varying efficiencies and inherent advantages:
- OLED – Stands for Organic LED (Light Emitting Diode). Instead of liquid crystals, organic (carbon-based) compounds are used to represent pixel color shifting. These screens can almost replicate the vibrance of classic CRT screens because it can generate its own light. AMOLED is a modified version with an additional TFT (Thin-film transistor) layer underneath more commonly used in mobile devices. OLED displays are in a significantly better economic position nowadays, with more monitor models in the market. However, compared to LCD, they still remain considerably more expensive to produce.
- Quantum dots – are very small nano-scale semiconductor particles that behave differently from other optoelectronic materials due to size-related quantum effects. As of 2019, all commercial products using quantum dots, including updated LCD TV models, use the key term QLED (Quantum dot LED).
- Mini-LED/Micro-LED – As its name suggests, it is an LED display that uses much smaller LEDs for the backlight/edge-lit array. How small, you ask? Well, you can assign several LEDs for a single pixel on the screen using Mini-LED, and probably thousands if using Micro-LED. This effectively allows mini-LED screens to display superior lighting properties that were only available to more advanced screen types before (“inherent local dimming” of OLED, for example). Simple, because the LEDs are “just shrunk down” to microscopic sizes, with no other complex physics being applied. However, this may be the most exciting development for LCD technology yet, which would once again extend its reign as the most dominant screen type for the next decade or two.
Part 2 – What They Do, How They Do: Monitor Terms & Specs
With more than sixty years of development under humanity’s belt, we have since then honed the modern monitor technology into an industrial powerhouse that caters to the individual display hardware needs of the common 21st-century folk. This includes specifications, which have now advanced to the level of standards that the interested customer can assess and evaluate with relative reliability.
Screen Resolution
This is the most basic, and straightforward specification of a monitor that is directly related to individual pixels. It is simply the total number of pixels at each side of the monitor. When referring to the screen resolution, the standard practice is to mention the number of pixels at the horizontal axis first, before specifying the pixels at the vertical axis. The two numbers are then separated by the letter’ x’, in the same way as you would when referring to polygonal area measurements. For example:
- 1280×720 – meaning the screen has 1,280 pixels horizontally and 720 pixels vertically
Commercially available monitors adhere to certain commonly used resolution standards, depending on the aspect ratio (more on that later) applied on the display.
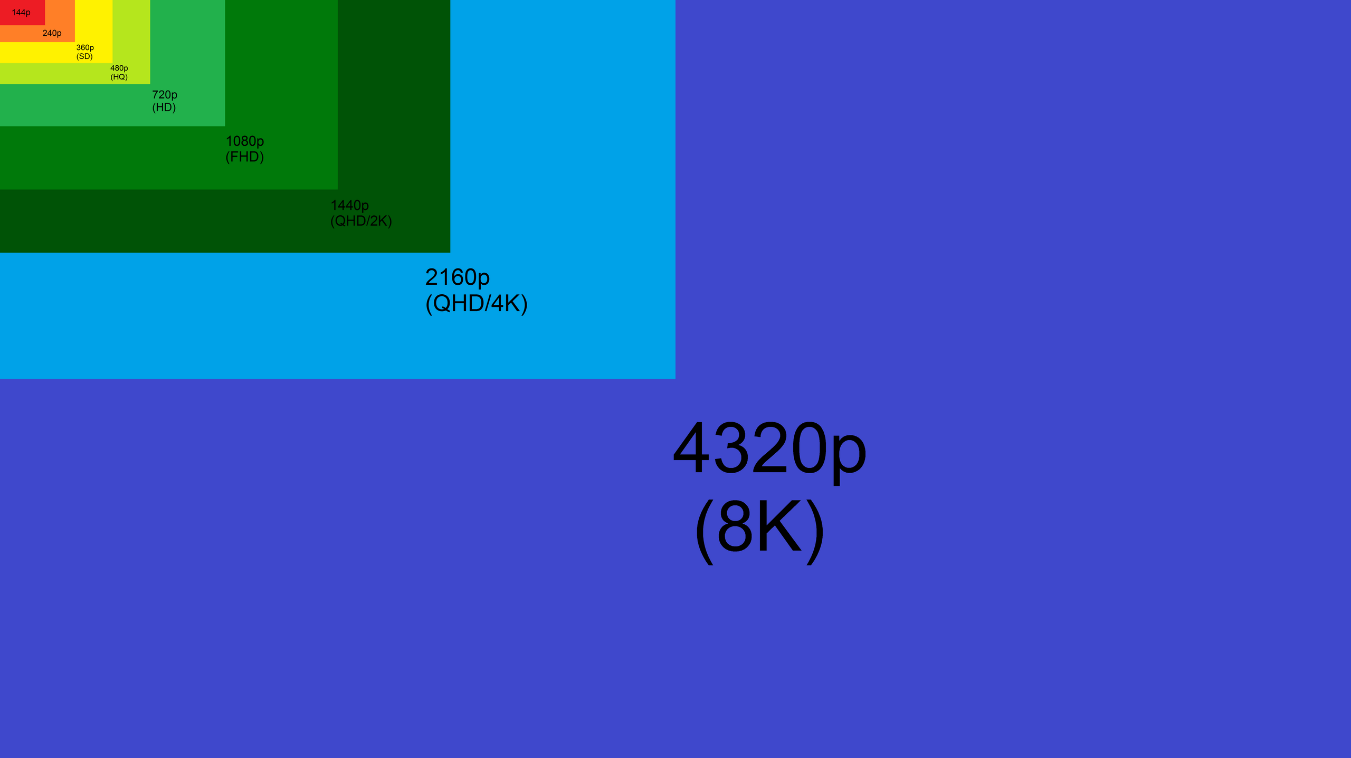
For 16:9 widescreen monitors, here are the typical modern resolutions, as well as their designated names and codes:
- 720p, or Standard HD – 1280×720
- 1080p, or Full HD (FHD) – 1920×1080
- 1440p, 2K, or Quad HD (QHD) – 2560×1440
- 4K – 3840×2160
Aspect Ratio
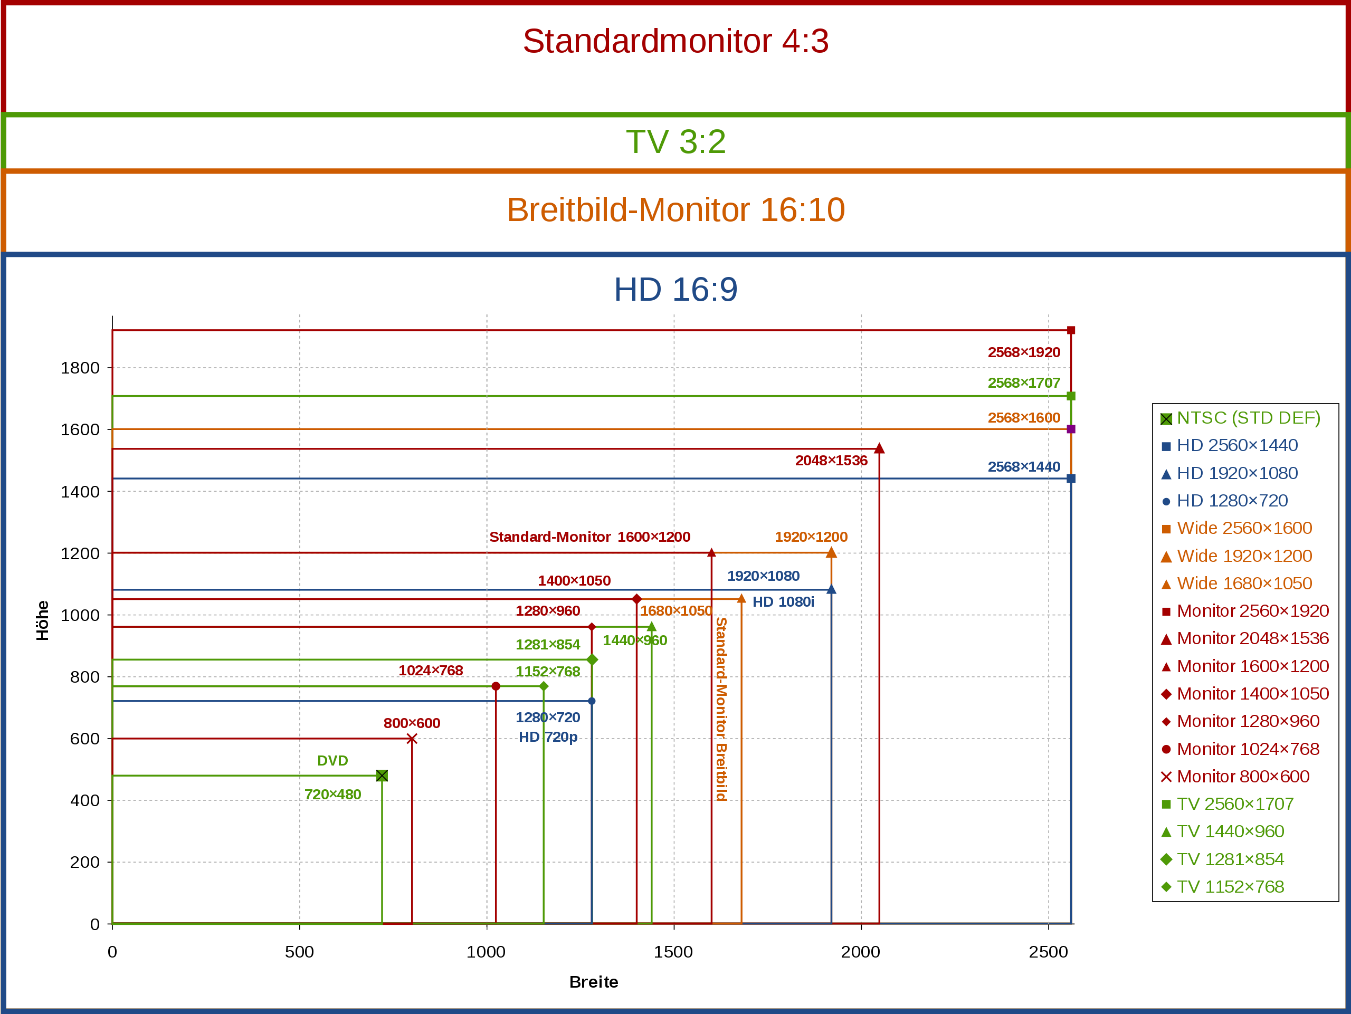
This is the ratio of the screen’s width, to its height.
This mainly determines the orientation and shape of the screen, and is commonly expressed by the two numbers of the ratio divided by a colon symbol. So when we said 16:9 earlier, this means that for every 16 units available horizontally, 9 units correspond to the vertical axis. It does not matter whether the units are individual pixels, or actual distance units.
The most commonly used aspect ratios on monitors are/were:
- 4:3 – the most traditional “square” aspect ratio in use since the early days of computing. Largely phased out in favor of typical 16:9 widescreen versions.
- 16:9 – current widescreen standard, so it is by far the most common out of all display aspect ratios in use today.
- 16:10 – the “beta version” of the 16:9 aspect ratio. Formerly the most popular widescreen aspect ratio for monitors until it was eventually phased out sometime after the 2010s. The resolution is now mostly relegated to smaller devices like tablets, where the slightly wider vertical side allows it to emulate book pages more perfectly.
- 21:9 – is the ultrawide screen variant of the 16:9 ratio, formatted from the longer cinema-based aspect ratios. Take note from, NOT for. Screens using the 21:9 aspect ratio are not really intended to be sold as “cinema multimedia” versions of 16:9 counterparts. Probably the most efficient aspect ratio that can use curved screens effectively.
- 32:9 – the super ultrawide screen format may be the least common (in terms of pure numbers), but they have a consistent niche-ish application for home theater setups. This is because this is essentially the movie-level “iMax-style” cinematic aspect ratio. Naturally, the biggest of the biggest monitors commercially available today fall under this category.
Screen Size

The actual, physical size of the monitor. While unit thickness is still included in this specification, the bigger emphasis is usually given for just the length and height. Actually, scratch that. The much bigger advertising emphasis goes to the diagonal length of the entire screen, which is almost always universally shown in inches.
Determining the length and width of a screen using its diagonal length is typically not required, as you can just look up at a monitor’s official specs, either on its online page or on a manual. But, if you somehow lost access to it, you can simply calculate it using the following steps.
- If you have physical access… well just measure it manually! (please exclude the bezels)
- If you don’t, find out the aspect ratio of the screen.
- With some Pythagorean Theorem magic, these diagonal values should appear:
- 4:3 = 5
- 16:9 = 18.36
- 16:10 = 18.87
- 21:9 = 22.85
- Divide the diagonal length value to the corresponding diagonal aspect ratio
- Multiply it by the first number of the aspect ratio for length
- Multiply it by the second number of the aspect ratio for height
For example, an old 18-inch LCD screen with a 16:9 aspect ratio would have calculated length and height values of:
18/18.36 = 0.98
For length: 0.98 x 16 = 15.69 inches
For height: 0.98 x 9 = 8.82 inches
Pixel Density
By the way, how tiny could pixels be exactly? Well, there is really no technical limit, so long as the size configuration is shown to be physically possible. You can cram as many pixels as you can for a specific unit of length and height if it could be shrunk adequately.
This is where the idea of pixel density comes in, more colloquially known as pixels per inch (PPI).
And that’s about it. Basically, you only have to equate the physical measurements of the screen to the screen resolution, and voila! Pixel density calculated. For example, a 14-inch screen with a resolution of 1080p would have a calculated PPI value of:
14/18.36 = 0.76
0.76 x 16 = 12.20 inches (length)
1920 (pixels) / 12.20 (inches) = 157 pixels per inch
Side note, so long as the aspect ratio stays constant, the result is still the same even when calculated using height values:
14/18.36 = 0.76
0.76 x 9 = 6.86 inches (height)
1080 (pixels) / 6.86 (inches) = 157 pixels per inch
(for those interested, the video above also includes a PPI calculator link)
Practically speaking, a good majority of users attest that the largest screen practical for 1080p resolution sits right about 24-inches, for 1440p about 27-inch to 28-inches, and anything beyond looks subjectively better in 4K.
The explanation is that individual pixels start becoming more visible (thus making images look more grainy) beyond the recommended maximum for each screen resolution.
Again, this is subjective and largely depends upon individual users. After all, there are still quite many mainstream display hardware products out there that don’t follow this pixel density trend (27-inch 1080p monitors, for example).
Refresh Rate / Response Time
Monitors don’t really make things move in-between images. The illusion of movement comes from the fact that each consecutive image is shown very rapidly per unit of time. The entire image itself is called a frame, and the frequency of a monitor usually refers to the number of frames that it can show per second of time. So 60 Hertz (Hz) means 60 frames per second, 144 Hz means 144 frames per second, and so on.
For most multimedia consumption, a minimum of 24 to 30 Hz is usually enough to provide a smooth viewing experience. In gaming and other more visually intensive applications, a base minimum of 60 Hz is typically recommended to reach once again that smooth experience. Much higher refresh rates correspond to even less delay between frames, and as such, many competitive games and a few specific professional applications are given leeway to let loose on very high refresh rates (144, 240, even 360Hz!).
Video Description: Very useful video explaining response times. They also make a great point at 2:25 where they mention to take response times from spec sheets with a huge grain of salt – this is because there isn’t a standardized way of manufacturers measuring it, and some may cherry pick their data and show only the most advantageous results. They also recommend doing your own research by checking trusted online sources for information, as well as third party party databases from sources who performed their own independent tests on monitors for things like response times or input lag times. By Techquickie.
Unlike refresh rates, however, response times are given much less priority when looking at monitor specifications. Remember how pixels are able to transform into different colors? The speed of that transformation is the monitor’s response time.
With current design standards, almost all monitors already reach the effective technical minimum of 5ms. Some advertise as low as 1ms, but that is usually a result of different monitor configurations of that particular model. Not directly 1ms, but instead an effective equivalent response time of somewhere around 1ms.
On older models of the past years (older LCD configurations), sure, the jarring afterimage effect of ghosting can be a problem with low-response-time monitors. But if the monitor is relatively modern and already has a competitive package of other specs, the response time usually already follows closely along.
If not, there would still be other perks that would make the response time spec be as competitive.
Input Lag
Something that’s a bit more of a concern for gamers than just smooth refresh rates is input lag. The name essentially describes itself, it is the time delay between button or key presses on any of your input hardware when using a software (in this case, a game program).
In terms of real-world usability, higher-tier monitors would usually have some sort of option to reduce input lag (that you can toggle at the model’s OSD menu if not directly available with the accompanying software). The experience of using these features is highly subjective though, and may only be truly noticeable for everyone on high refresh rates (100Hz+).
Also, if you are using lower refresh settings (75Hz below), keep in mind that input lag will also slightly (sliiiiiiiiightly) affect the slice of timing that it can cut between changing frames. Because of this, it is usually recommended on some competitive multiplayer games to keep the higher refresh readings anyway (instead of locking the frames to the maximum refresh rate), even if your monitor could no longer physically render those frames. Also, adaptive screen technologies (more on that below) might also affect how those input timings are placed within each scheduled frame (spoiler alert: never to a totally jarring degree).
Panel Type
Video Description: An excellent intro, description, and comparison of TN, IPS, and VA panel. They give a great overview without going into excruciating detail. By Hardware Unboxed.
Even among similar LCD screens, delivering the same color for each pixel can be vastly different. This could either be because the final objective of each display is different, or that costs come into play whether one type becomes more accessible than the other. For the most part, however, excluding the other newfangled and exorbitantly expensive display technologies, we mainly have:
IPS (In-Plane Switching) – Gives the most vibrant images, best viewing angles, with usually the best color representation among all popularly known types. It was traditionally the most expensive option, until production techniques have improved and has since then been relatively on par cost-wise with VA panels. IPS glow is a term used to describe a sort of backlight bleeding (backlight becomes more prominent than black colors) that happens on the corners of IPS panels, which become more prominent on lesser quality models.
IPS Operational Description: Light properties of the screen are modified via shifting liquid crystal molecules within just one plane via rotation, hence its name, “in-plane switching”).
VA (Vertical Alignment) – Somewhat less vibrant than IPS but a bit more affordable, VA panels had typically functioned as the balanced option, providing high frame rates and noticeably better color accuracy than TN panels. If low-quality IPS suffer more from IPS glow, inferior VA panels are notorious for the smearing effect, a specific inherent ghosting issue that leaves the entire screen momentarily “smeared” with the previous afterimages until motion stops.
VA Operational Description: VA is technically similar to IPS, in that it also rotates the liquid crystal molecules to change light absorption properties. The orientation, however, is vertical, so one position puts the liquid crystals at vertical points together, while another has them sandwiched between each other in a horizontal stack.
TN (Twisted Nematic) – the oldest type of LCD screen, dating back from the very first day’s of the technology’s inception in the 1970’s. Still in relatively common use today, and was originally the flagship panel type for the lowest cost models sporting higher refresh rates. While TN is comparatively inferior now to good quality IPS and VA type monitors, the difference isn’t so stark as to make you effectively color blind when using one. That being said, the limited viewing angles does remain as its worst negative flaw.
TN Operational Description: When voltage is applied to the liquid crystal layer, the molecules unwind, creating an opening which allows modulated light to pass through. When it is in the OFF position (no voltage applied), the molecules are twisted around by default, preventing light from passing through, thus making the screen completely blank.
Signal Input / Connection type
Video Description: A straightforward and very beginner-friendly overview and comparison on HDMI, DisplayPort, DVI, VGA, Thunderbolt ports. By PowerCert Animated Videos.
Aside from the light modification medium, the way electric signals are modulated to produce the desired image producing effects have also changed throughout the decades. VGA, or the DE-15 D-sub connector might still be in good use today, but you would more likely find these ports in more modern monitors:
- HDMI – probably the most familiar type of modern connector to everyone. Stands for High-Definition Multimedia Interface, it was a proprietary audio/video signal input interface designed to transmit purely digital uncompressed video and audio data in a single line with significantly higher bandwidth than what was available during the early 2000’s. It effectively supplanted the already-digital DVI interface, becoming one of the default interface standards since 2010.
- DisplayPort – is yet another proprietary audio/video signal input interface. This time, it was developed and maintained by the Video Electronics Standards Association (yes, that VESA). Unlike HDMI, which focuses on uncompressed multimedia data, DisplayPort relies on packetized data transmission, the same data-transmission method by other data transfer interfaces such as Ethernet and USB. Because of this configuration, DisplayPort can deliver even wider data bandwidth than all other previous interfaces. In fact, it was known earlier as the default high refresh rate connector, before updated standards made such option available by default on most video output connections today.
- Thunderbolt/USB Type-C – one of the later high-speed multimedia data interfaces largely advertised for mobile connections. For this connection type, the objective is to combine both high-resolution multimedia and high-speed/quantity data into a single unified cable. Power devices, play audio, watch videos, and transfer data all in just a single line! Bandwidth is yet again improved, so all given features can be used at once without sacrificing performance for one or the other. In addition, whereas earlier Thunderbolt 1 and 2 versions used mini-DisplayPort as the primary connector, nowadays Thunderbolt 3 and 4 use USB Type-C, hence the connection (pun intended).
- DVI (Dual-Link) – the OG mainstream/commercial digital video interface. DVI ports are still featured occasionally from time to time on certain monitors even to this day, though their numbers are rapidly dwindling even since HDMI took over its role more than ten years ago.
VESA Mounting
Video Description: A very short and practical intro to VESA, along with a very useful demo on a TV and explanations. If you’re not familiar with VESA we recommend it. It’s only 2:00 minutes and gives you a solid overview. By Kanto Solutions.
VESA stands for Video Electronics Standards Association. So uh, yeah, the acronym is totally different compared to that of HDMI and others intended as design standards. It is an organization, first and foremost, one that regulates and promotes uniformity in all kinds of applicable commercial video technologies. In this particular specification, VESA mounting refers to the organization’s installation standards for the four holes at the backside of monitors. The plan is to use them simply as measurement guidelines, for those who intend to use them within a custom configuration (on something more than just putting them on a flat surface).
As such, the rating is simply the given value of the length and height of the holes, which can be confirmed by checking the product spec sheet, looking it up on some official page, or via a good ol’ tape measure. Suppose you are using wall-mounting accessories, or planning to connect several monitors on adjustable table arms. In that case, you simply have to match the VESA mounting measurements to the extra equipment you are trying to purchase.
Oh, before we forget, not all monitors are VESA mounting compatible, so double-check that if it’s going to be a thing for you in the future.
Panel Curvature
Video Description: An amazing in-depth analysis on monitor curvature by Reviews For Life. We’re 95% sure you’ll be pleasantly surprised at how good this video is. As their description says, they cover “some not-so-common facts about curved displays that most people gloss over”. It’s simple, straight-forward, and we strongly recommend you check it out.
Yup, this is the configuration on whether a monitor is curved or flat. Both types have its own advantages. But basically, curved monitors are configured by what we could call the “R measurement.” For example, if the monitor is rated at 1000R, it would take a distance of 1000mm from the center before the angles of both sides of the monitor meet.
Wait, angles?
That’s right. The video above explains it better, but curved panels are not actually made with a perfect tangent curve. It’s more like a prominent curve at the center, with both sides being relatively flat at the edges. This can be easily seen by putting a ruler at any point of the monitor’s screen. You’d notice that the curve only really applies completely near the center, while the rest of the monitor shows lesser curvatures near the edges)
The video also goes into better detail on the pros and cons of flat and curved panels. But to summarize, things intended on flat panels work best on flat panels (image editing with prominent straight lines, for example). In contrast, curved panels provide the best level of immersion on things that don’t have field of view (FOV) tricks by default.
Technically, there are no set standards (general names) for the curved configuration of commercial monitors. So if you want to determine if a curved monitor’s level of curvedness (R value) will work for you, you’ll just have to search manually for its spec sheet or reviews online.
Adaptive Sync Technologies
Screen tearing is a screen issue that is often discussed in gaming within the context of preserving game quality. Basically speaking, it happens when the number of frames being made doesn’t match the actual max refresh rate of the monitor, occasionally rending the next frame partially incomplete for a very tiny (but still noticeable) split second.
Adaptive sync technologies are built especially to correct this inherent performance flaw. Instead of forcing the variable frame rate into the maximum frame rate, the technology “schedules” the frames accordingly. This way, no matter how up and down the frame rate goes, it will still sync up more or less perfectly with the refresh rate. Freesync and G-sync are different versions of current mainstream adaptive sync technologies, developed by AMD and Nvidia, respectively.
It should be noted that for adaptive sync technologies to work consistenly, it needs to work on a set minimum number of frames (usually starting 45 above) for proper scheduling. Anything lower and the feature usually automatically cancels out, returning your gaming experience to that potential screen tear-y mess before the frame rates go back up again.
By the way, in case you don’t have adaptive screen technologies on your old monitor, don’t fret. V-sync is a more classic feature that can be tweaked within games and other multimedia to match the frame rate with the monitor’s refresh rate instead. This not only makes the play experience potentially smoother, but it also reduces usage resources of your hardware, allowing them to draw less power, operate with less heat, provide a bigger overhead for other tasks, among other reduction benefits.
High Dynamic Range (HDR)
Dynamic range, simply put, is how dark or how light elements of an image (that should be hit with lights or cast a shadow) could be on a particular screen. Therefore, High Dynamic Range, or HDR, is the advanced capability to display lights and shadows on videos and images, making it easier to see detail while maintaining a stunning level of light-level accuracy.
HDR10 is known as the current HDR standard. However, monitors will have different HDR ratings (VESA DisplayHDR) depending on their tier and how advanced HDR was at the time of its commercial release. If you want the best of the best, opt for the highest ones that you can afford (DisplayHDR 1400, 500 True Black). Otherwise, settle on a budget balance on a lower standard, although it is highly recommended that you go for at least DisplayHDR 500.
Also, keep in mind that enabling HDR requires the software or multimedia to have HDR features in the first place. A game, for example, needs to have a toggle-capable HDR tweak in its options menu, before you can enjoy superb lights and shadow for that title.
Other Specs of Note
Video Description: A great video guide on color accuracy. It’s aimed at creative professionals, and has some very beginner friendly explanations, as well as timestamps, so you know what to expect and easily navigate through the topics covered. By Ben G Kaiser.
Finally, here are the technically lesser (from the casual consumer’s perspective) priority specifications that are still worth mentioning for your consideration:
- Color Gamut/Space – the color spectrum available on your monitor. For standard use, sRGB is enough (even for regular video editors). If you need a bit more color accuracy for highly professional applications, seek Adobe RGB/NTSC. For aspiring cinematographers, having a DCI-P3 option works best. And so on.
- Brightness/Contrast – traditional light intensity and sharpness settings. Not really a factor (or should we say, adequate adjustment is already provided on good models) unless you link cranking them all the way down or up.
- Viewing Angles – Widest viewing angles for typical commercial LCD monitors are about 170+ degrees. IPS, of course.
- Power Consumption – never really a factor for modern monitors since they hardly ever go three digits (typical is about 20 to 50 watts under load). But do be wary of ultra high-refresh-rate (gaming) monitors in this category, as some of them can be super energy hogs when put to hard work.
- Blue Light Filtering – light within the blue wavelength range is often attributed to increased levels of eye strain and the potential disruption of sleep cycles. This feature tries to fix just that, with varying degrees of adjustment depending on the type of filtering and specific monitor model.
Part 3 – Prerequisite Demands: Initial (Technical) Priorities in Monitors
To better solidify your choice for the mainstream monitor of your available budget, there are several first-line priorities that you have to consider first before delving into your personal preferences, and these are:
- What exactly are you going to use it for? A general-purpose monitor certainly will not be able to benefit from the extra cost poured into its boosted frame rates. Same as buying an “elite class” monitor for your day-to-day work. Know the monitor’s main purpose, and stick to it. Consider spending extra only if you really, really need other specific important uses for it.
- Can you effectively use all the features that you have paid for? Investing in a monitor usually requires a good amount of funds. Therefore, going for the best bang-of-the-buck option won’t necessarily mean anything if all those “economically packed” features are not really going to be used ever. Case in point, just choose something cheaper if you can’t.
- Do you have enough desk space for a specific setup? It might be better to start pulling out your measuring tape and calculating how your future monitor(s) would fit on your tabletop estate. And remember, you also need to pull out the table a bit, should you decide to add certain VESA mounting hardware.
- Do you need an ultrawide monitor? The answer actually lies more on potential productivity, with gaming only being a second priority. After all, an ultrawide screen might eliminate the need for you to buy an extra monitor due to the significantly increased virtual workspace. Quite convenient if you’re the type to love having bigger, more scenic views of your play arena.
- Preview the actual product in person whenever you can. Shopping online for monitors is obviously more convenient if you already know what to buy (the product would most likely require remote delivery anyway). But checking for response times, color gamut, and build quality is almost always better when done in person. Do take note, though, that you only have to do this if you can. If enough professional reviews have convinced you enough, then there is perhaps no more need to worry about your purchase.
- Cost hierarchy typically goes by screen size first, followed by resolution and refresh rate, which are then all wrapped around by its brand and panel type. This means that bigger monitors are usually the most expensive, even when compared to a smaller model with a higher resolution and maximum refresh rate (could be equal, but the bigger one is still usually more expensive).
- Plan for the very long-term. Monitors are still pieces of investment for your system, no matter how much disposable income you are able to throw at it. Thus, you should choose a specific model with the intent of using it for at least five to seven years. If you think you can slowly upgrade your hardware from there, then you might not actually have to match your GPU to it at the time of purchase.
Part 4 – Mainstream Demands: Use Case Priorities in Monitors
But if you want a more usage-based selection style, you also need to put additional priorities depending on the primary category that your future monitor will soon fall to:
What to look for in a gaming monitor
- While 75hz is enjoyable enough, especially for more modest systems, go for 144Hz anyway. They’re relatively cheap now (specifically 1080p ones), and are good starting points for a GPU upgrade in the near future.
- 1ms response time may be a fad, but go for it anyway. It may be already part of a cross-feature set for your gaming monitor choice, but eh, just enjoy it as an included bonus.
- Any adaptive sync option is highly recommended. Freesync is, of course, the cheaper option (usually), so you’ll most likely drift towards models featuring AMD’s version.
- Bumping resolutions will demand significantly higher performance from your GPU, since so much more pixels need to be processed per second. Don’t expect your GTX 1070 to max out a fresh new 1440p 144Hz monitor.
- While TN is still quite competitive in terms of cranking frames, the fact is cheap IPS has been a thing for quite some time already. The choice usually just falls between VA and IPS.
- 240Hz looks and feels better, but the increased precision advantage is only fully utilized in competitive multiplayer games. In a vast majority of gaming situations, 75-144Hz is usually more than enough.
- 360Hz is even worse, with completely diminishing gains over the viewability of individual frames. As of now, such boosted refresh rates don’t have any inherently huge advantage compared to anything considerably lower.
- Going 1440p 144Hz is usually the sweet spot in a mid-range gaming system today.
- Model-exclusive gaming features (Like the Extreme Low Motion Blur of certain Asus monitors) can be nice to have. But generally take their real-world performance with a grain of salt.
What to look for in a monitor for photo/video editing
- Wide/multiple color gamut. ‘Nuff said.
- Go for IPS. No more, no less.
- Flat screens might be better for image reproduction quality.
- 1080p is kinda workable, but at least go for 1440p. Even better if you go 4k.
- Since this will be a workstation, a larger size (of usually 28 to 32-inches for standard desks) may be more convenient.
- If buying multiple monitors over a longer period of time, make sure that the VESA mounting option is the same across all of them for easy configuration.
- Gaming on the side? You might want a separate, smaller, but higher refresh rate monitor connected instead.
What to look for in a monitor for business/productivity
- Super/ultra-widescreen monitors offer a bigger screen estate for productivity, and can even be curved without the need to worry about image reproduction quality.
- If not into such wide aspect ratio monitors, you can just opt for bigger screens. Something like a 1440p 27-inch, or a 4k 32-inch would still do you quite nicely for visual multitasking.
- It is also recommended to look into the possibility of adding a few smaller monitors for literal (work-based) monitoring stuff, in order to support more multitasking potential for your system.
- Look for a model with nice low blue filtering features, or at least look for “eye care optimized” LCD models.
- If not using VESA mounting, find a nice model with good tilt, swiveling, and height adjustment (to keep your head posture always properly aligned regardless of chair or desk setting).
Part 5 – The Pitfalls of Expectations: Monitor Stuff to be Wary Of
Like all things revolving around choices, there are quite a number of pitfalls that can cause mistakes in your choice. Or, even if you did not technically make a mistake in choosing a high-quality monitor, the priorities might not directly line up with the satisfaction requirements that you really want:
- Always double-check the available ports on a specific model. Quite a number of users eventually find themselves disappointed at certain promising models that turned to not have the port that the intended to use it for. As a rule of thumb, VGA and HDMI are usually always available, DisplayPort gets “unlocked” at 144Hz and above models, and USB Type-C is typically added on high-end stuff.
- Screen size does not matter much; what matters more is screen size + matching resolution. As we hinted earlier, there are optimal resolution settings for particular screen sizes to maintain relatively acceptable pixel density levels. This isn’t just about the user’s subjective experience with viewing individual pixels. Cost is also considerably affected by these specs, so it is usually recommended to keep things in comparative balance.
- A high refresh rate won’t change your world, but it will definitely change your view (pun intended). True. It is definitely an eye-opening experience to witness 144Hz for the very first time, whether you’re watching a video or gaming. Not so much for 240Hz, which is only really effective for competitive online games. 360Hz is even worse investment-wise.
- When it comes to HDR, only pay as much as you see fit. Higher versions of HDR definitely enhance your multimedia experience, but the differences aren’t really that high enough to warrant paying the extra amount if it is required.
- Speaking of gaming, don’t forget to match your GPU to the capabilities of your monitor for such purposes. While an RTX 3060 can easily max out that 27-inch 1440p 240Hz IPS monitor on the likes of Doom Eternal, Valorant or the eternal Rainbow Six Siege, don’t expect the same thing on other triple-A titles such as Control or Far Cry 5, or even the notoriously unoptimized Cyberpunk 2077. If not upgrading for the long-term, consider just stepping down either your resolution, or your refresh rate, or even your screen size (and save money in the process).
- If your high spec monitor gets really warm while turned on, don’t panic immediately; it’s designed to be that way during heavy frame loads. Some people who might be going from regular low-spec monitors to high-end ones might be surprised that LCD monitors can get quite warm during graphically intensive tasks. If it’s not doing anything heavy and still gets hot, though, well that be a sign of a technical issue.
Oh, and last but not least, stick to 24 and 27-inch screens for competitive shooters. Make it curved too, if possible. This is because you start to dart your eyes more to cover a bigger field of view on the game screen at bigger physical sizes. So while a 32-inch 4K monitor is perfect for binging Netflix or writing software, you wouldn’t exactly be able to perform as well when playing COD Black Ops – Cold War… or even a 3rd person shooter like Fortnite.